For a free no-obligation online quotation please click here
Measuring, Fitting & Maintaining Glass.
The following advice applies to splashbacks, upstands and wall panels.
Accurate measuring is the most important part, get this wrong and your product will not fit. It is not as easy as you might think to acheive a professional, well fitted end product, especially if the glass has cut outs, holes etc. If you are in any doubt, then why not let us template & fit for you.
Measuring
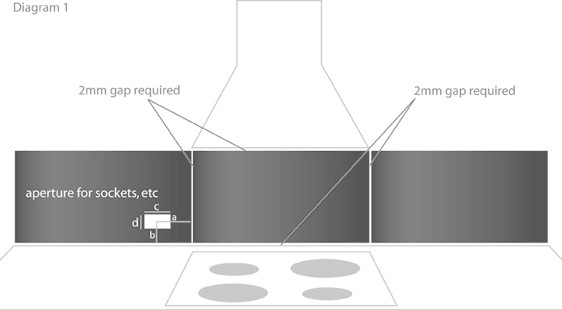
Large areas of wall can be covered by single panels of glass, but for ease of handling and to reduce risk of breakages, we recommend that no glass splashback panel is any longer then 2m, so if you have a run of wall that is longer, then the panels should be separated into multiple lengths to make up the total. The distance between pieces need only be 2mm which means the wall will still appear smooth and virtually seamless.
If you are making a template (exact replica) this should be made out of hardboard or MDF. Templates should always have straight edges unless there is a deliberate curve or cut out.
Firstly, check the base surface (worktop or shower or where the glass is to 'sit' on) with a good spirit level. If this surface is not level we can cut the glass out of square so that the side will be vertical. We recommend you keep the glass vertical wherever you have pieces butting against one another. Draw a perpendicular line the length of the base. You can now measure the difference between the base and the line at each end to find out how far out of square the height is. It is important to do this or your ends will not be vertical!
Next do the same vertically at the ends to let you know if and by how much the sides are out of square. You can then measure between your lines and add on for any off squareness.
Do not measure too tightly, always leave a little in order to fit the panels and as a margin for error. The industry standards for glass cutting are + or - 2mm, also remember, there can be a variation of up to 1mm between different tape measures.
Socket Holes and other Apertures
Where you have plug sockets or other wall mounted items requiring a hole to be formed within the glass panel, you will need to provide the measurements. The way to do this is to measure from the edge of the panel to identify the location of the centre of the hole and then provide the dimensions of the hole itself as well as details of the item you need the hole for.
So, for example, for the hole shown on the diagram below, measure to the centre of where the hole needs to be from the nearest vertical edge of the splashback (dimension a) the nearest horizontal edge of the splashback (dimension b) the dimension of the hole itself (dimension c & d) and then a description of the item the hole is required for (eg. double socket, pipe, single switch etc) Holes should be a minimum of 50mm from the edge of the glass or each other, unless they butt up to one another. Therefore 50mm of glass should be all the way round any hole.

Cut Outs
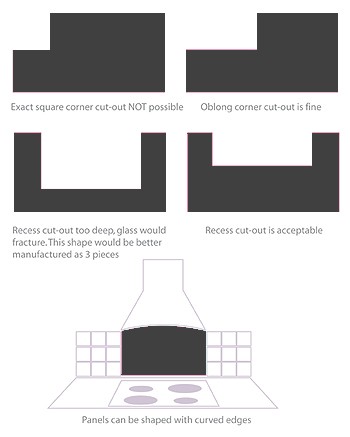
Where you need to have a panel shaped, for example to accommodate a cabinet corner, or to extend a splashback from the hob, you will need to provide details of the cut out shape. There are a few rules to remember, first being that you can't have a sqaure cut from the corner of the splashback (it will cause the glass to fracture), but you can cut an oblong. Also, the depth of the cut is important, if the cut out is too deep, the glass is likely to fracture.
The table below is an indicator, please contact us if in any doubt.
| Single Socket |
|
75mm x 75mm |
| Double Socket |
|
135mm x 75mm |
| Double Socket + Single Socket |
|
218mm x 75mm |
Cooker Hoods
Glass can be shaped to fit snuggly up to your cooker hood, even if it is curved. To get the curve shape correct, you need to provide the radius information from the manufacturers spec.

Gas Burner Hobs
If you decide to purchase one of our amazing glass splashbacks and have a gas burner hob. Please ensure your hob has been fitted correctly to the manufactures guidelines and instructions.
Gas burner hobs usually need to be installed around 55mm away from the back wall. Failure in this could result in scorching of the colour of your glass splashback if exposed for any length of time.
Expansion Gaps
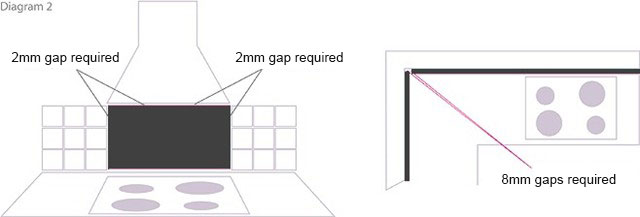
Where a glass panel is fitted up against another glass panel, or any other item, you need to leave 2mm expension gap. This is then filled with sealant. Again, the diagram below shows a number of instances where the gaps need to be acounted for in the measuring process.
Internal Corners
Please remember to knock 8mm off one panel on internal corners ( 6mm for 1st piece in position and 2mm expansion gap).
And as a final comment with regards to measuring, make sure you measure it at least twice!! This will reduce any errors made by simple things like not holding the tape in the right place, even better get somebody else to check the measurements for you.
PLEASE REMEMBER: Once the glass panels are cut to your requirements, as they are toughened, they can not be altered in any way.

Fitting
Bespoke glass splashbacks are fitted using a special adhesive and sealant. Generally available, these are solvent free and most commonly come in clear and white. These are both available from ourselves.
To adhere the glass splashback panel to the wall, first line up the panels carefully, then apply the adhesive in lines down the back of the panel following the instructions on the adhesvie/sealant you have purchased. You will find there is enough 'give' in the adhesive to make minor positional adjustments after placing the panel in position. When you are fitting adjacent panels or butting against another item, be sure to leave the 2mm expansion gap in between. You can use tile spacers or matchsticks if you wish.
Once the panels are firmly in place, carefully seal all edges with the sealant. Once complete, to clean and polish the surfaces and get rid of any marks, use a fine wire wool.
Maintanence
Maintaining your glass products really couldn't be easier. They are easy to wipe clean and when you need to get rid of any stubborn marks, use fine wire wool as mentioned above.
Darker colours may need to be lighlty buffed after wiping.